


方案详情
文
本文章详细介绍了牛奶中pH的测定,包括校准液、水样的准备,校准和测量过程,以及电极和仪表的维护等内容。
方案详情

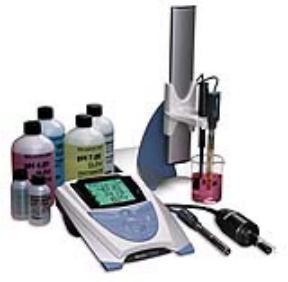
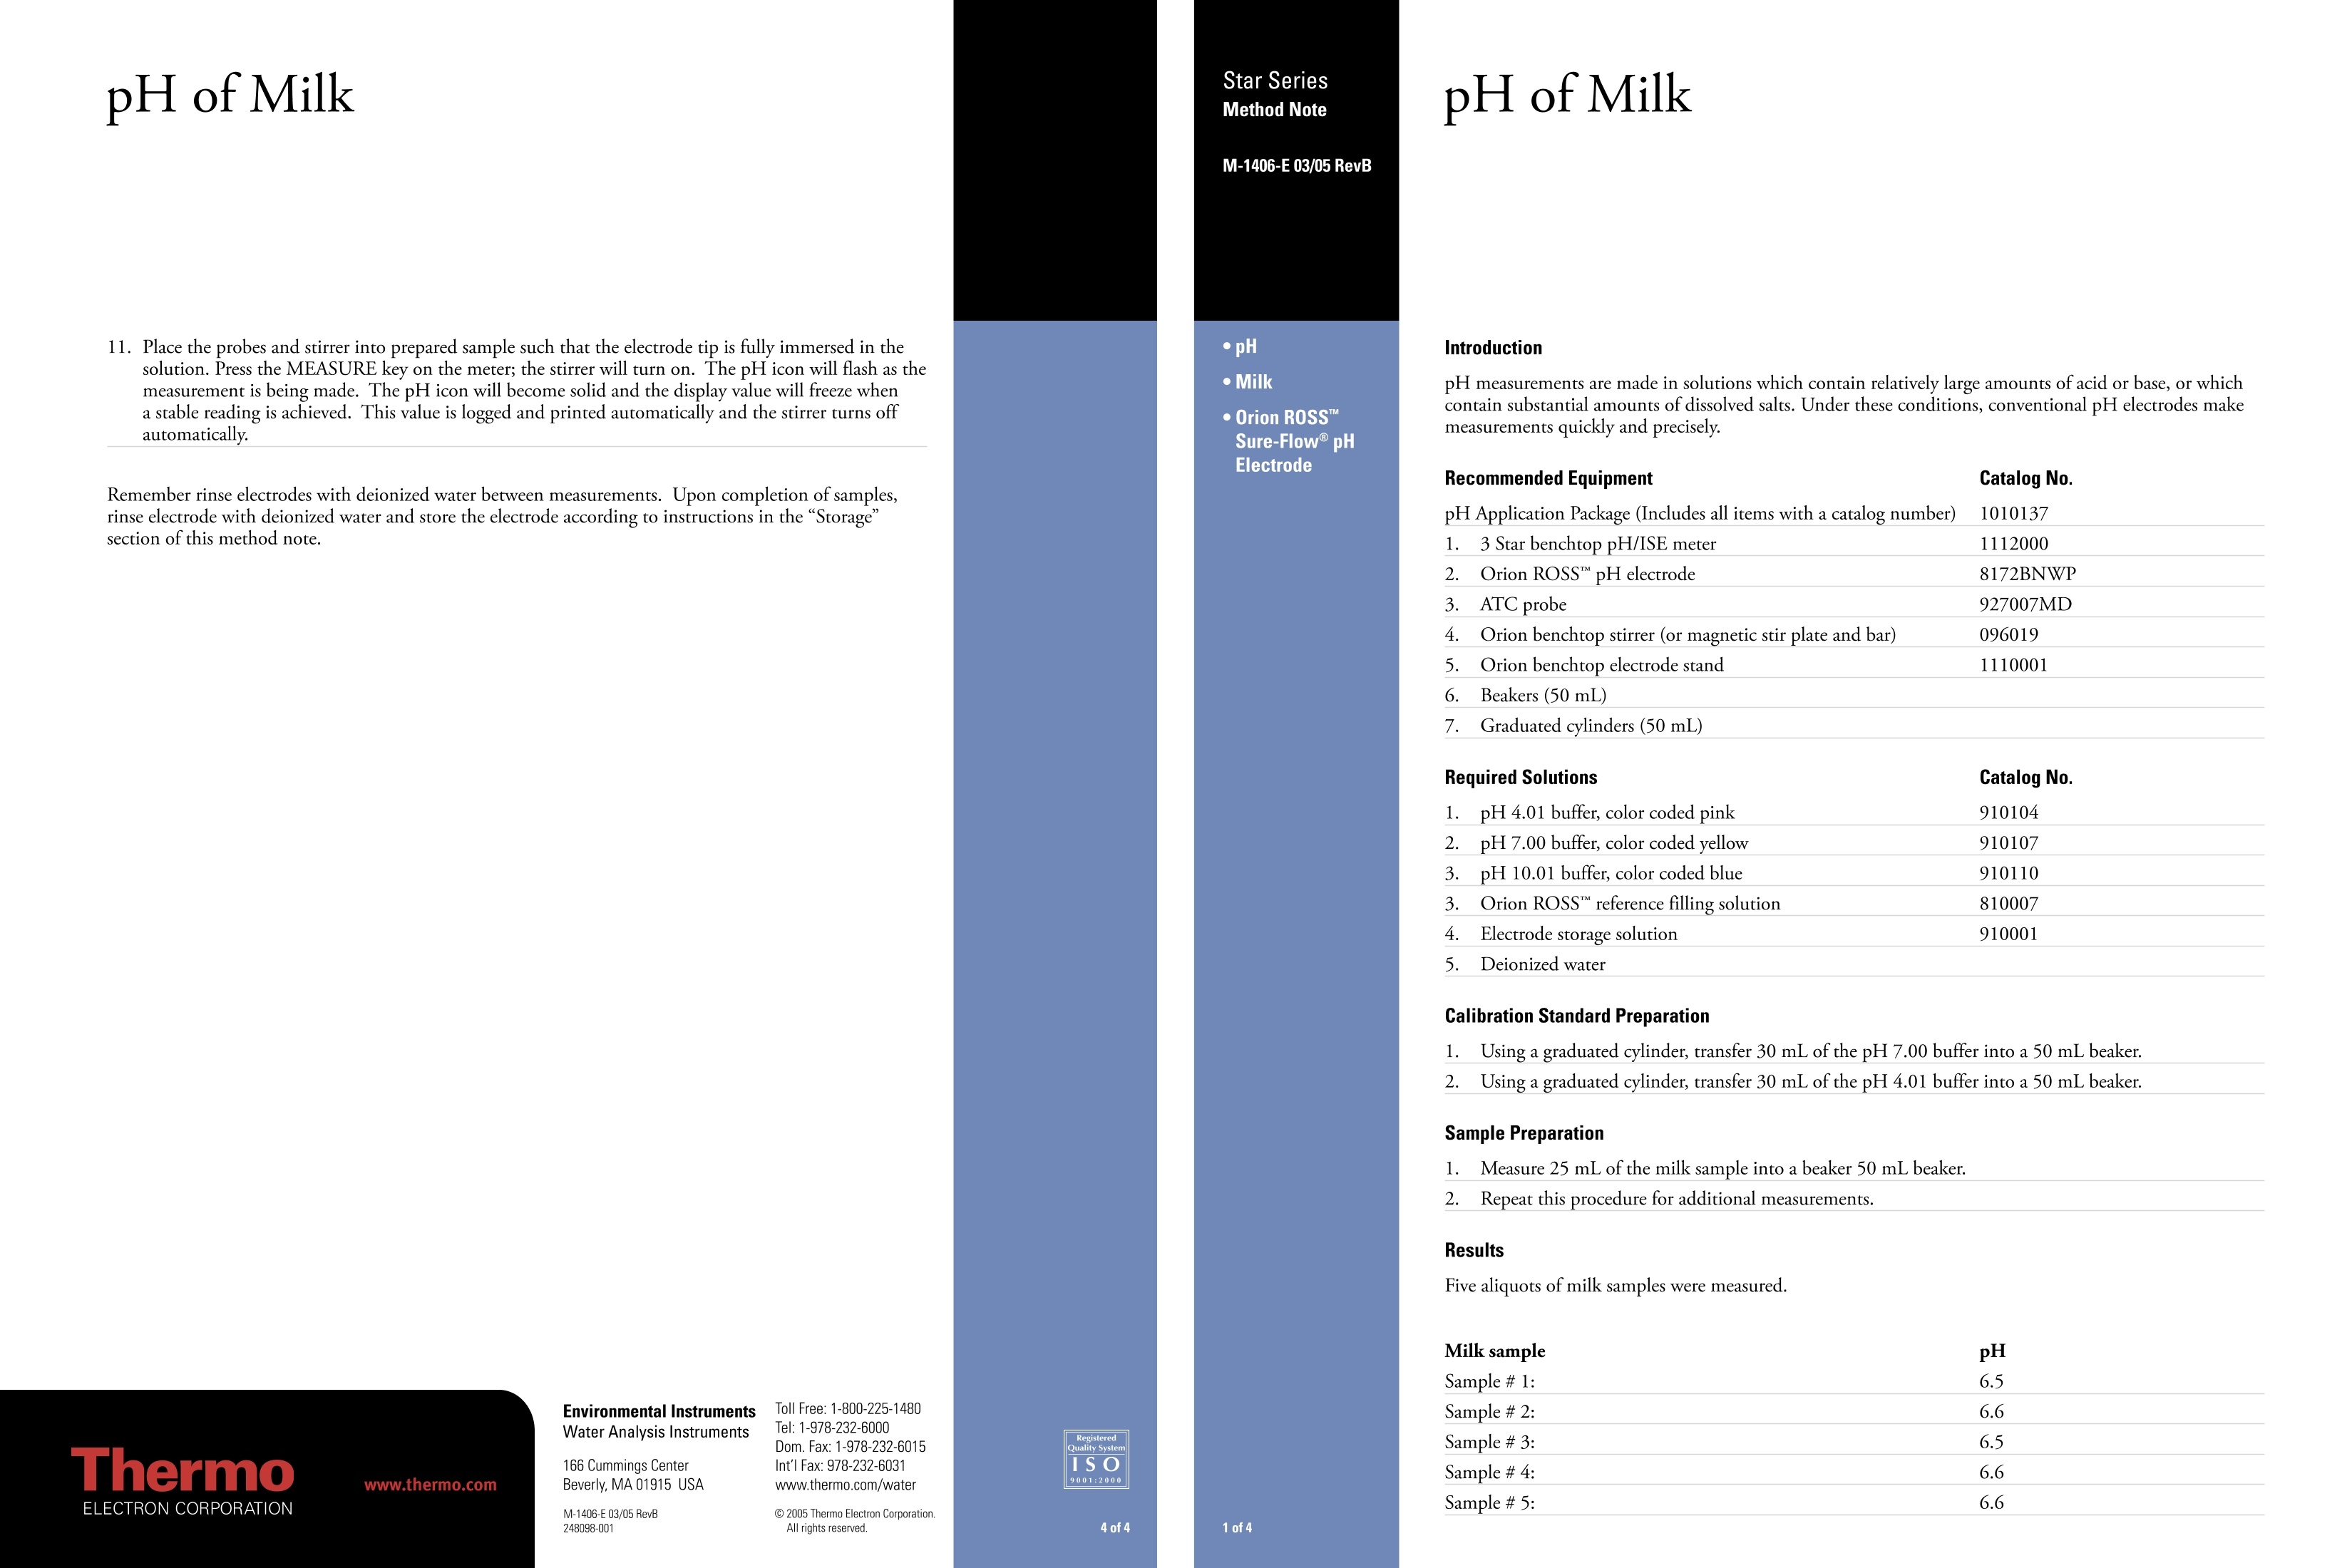
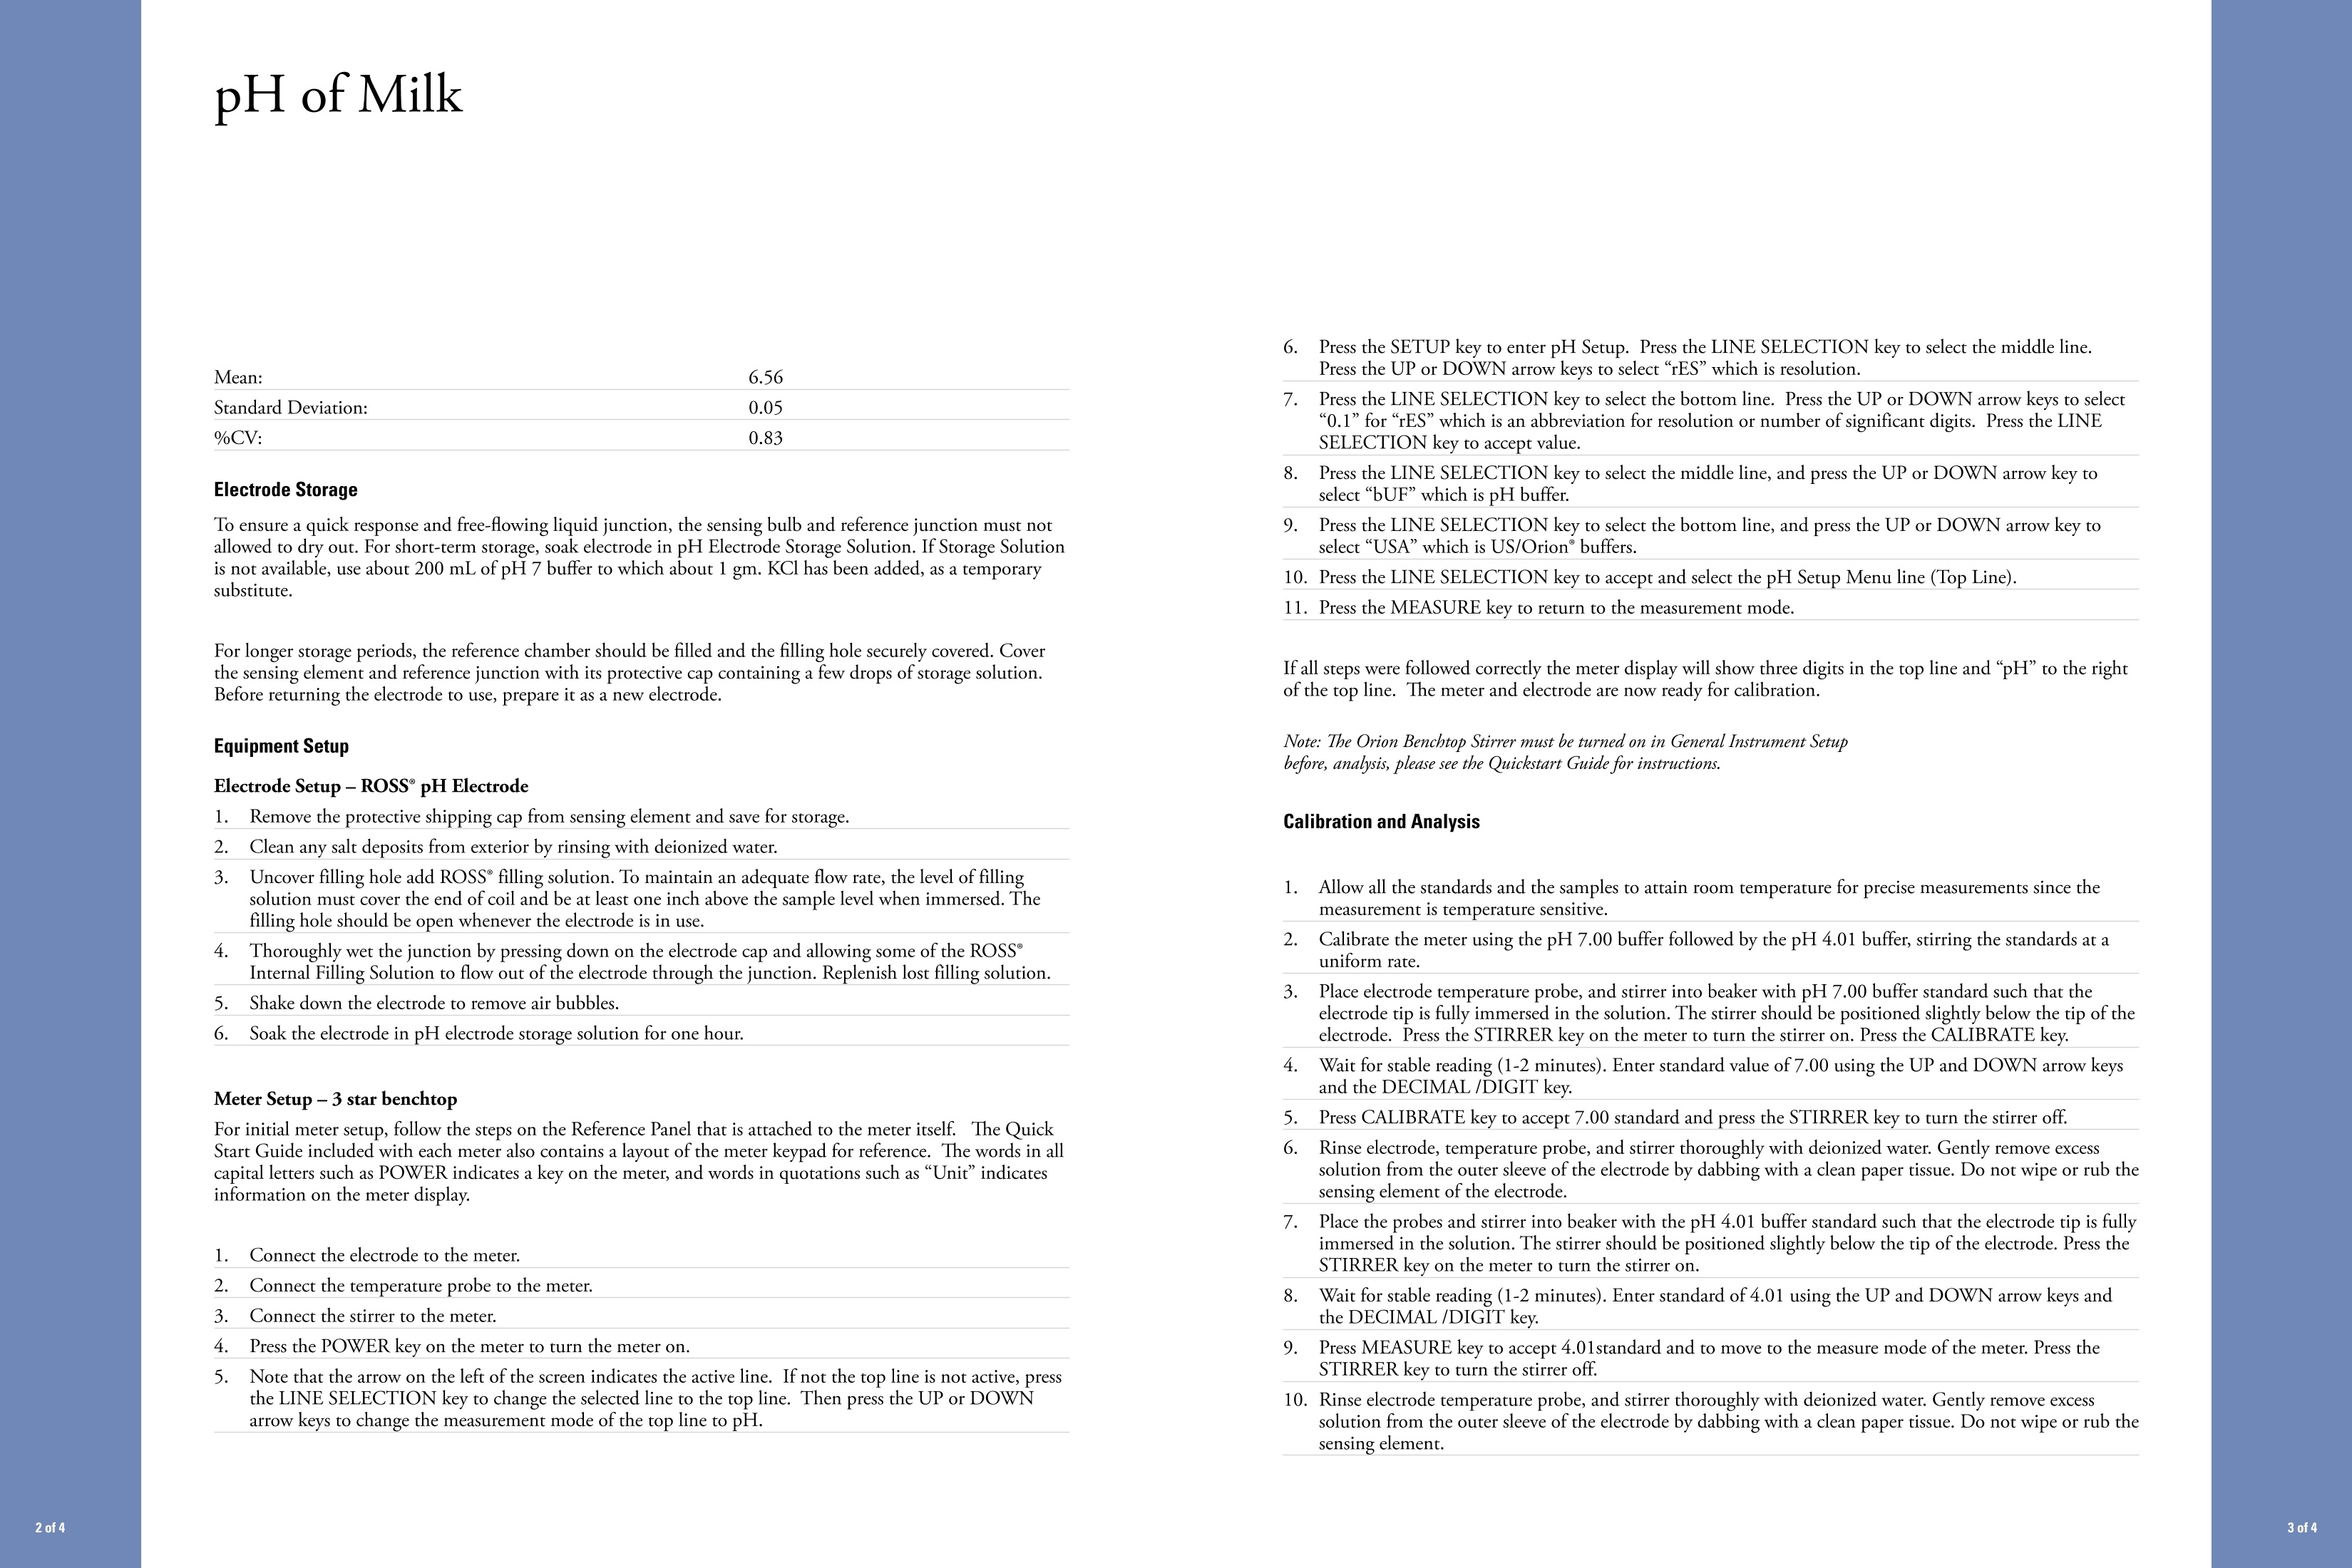
pH of MilkpH of Milk pH of Milk Star SeriesMethod Note M-1406-E 03/05 RevB 11. Place the probes and stirrer into prepared sample such that the electrode tip is fully immersed in thesolution. Press the MEASURE key on the meter; the stirrer will turn on. The pH icon will flash as themeasurement is being made. The pH icon will become solid and the display value will freeze whena stable reading is achieved. This value is logged and printed automatically and the stirrer turns offautomatically. pH Introduction ·Milk·Orion ROSS"Sure-Flow@pHElectrode pH measurements are made in solutions which contain relatively large amounts of acid or base, or whichcontain substantial amounts of dissolved salts. Under these conditions, conventional pH electrodes makemeasurements quickly and precisely. Recommended Equipment Catalog No. Remember rinse electrodes with deionized water between measurements. Upon completion of samples,rinse electrode with deionized water and store the electrode according to instructions in the “Storagesection of this method note. pH Application Package (Includes all items with a catalog number) 1010137 1. 3 Star benchtop pH/ISE meter 1112000 2. Orion ROSS" pH electrode 8172BNWP 3. ATC probe 927007MD 4. Orion benchtop stirrer (or magnetic stir plate and bar) 096019 5. Orion benchtop electrode stand 1110001 6. Beakers (50 mL) 7. Graduated cylinders (50 mL) Required Solutions Catalog No. 1. pH 4.01 buffer, color coded pink 910104 2. pH 7.00 buffer, color coded yellow 910107 3. pH 10.01 buffer, color coded blue 910110 3. Orion ROSSreference filling solution 810007 4. Electrode storage solution 910001 5. Deionized water Calibration Standard Preparation 1. Using a graduated cylinder, transfer 30 mL ofthe pH 7.00 buffer into a 50 mL beaker. 2. Using a graduated cylinder, transfer 30 mL of the pH 4.01 buffer into a 50 mL beaker. Sample Preparation 1. Measure 25 mL of the milk sample into a beaker 50 mL beaker. 2. Repeat this procedure for additional measurements. Results Five aliquots of milk samples were measured. Milk sample pH Environmental InstrumentsWater Analysis Instruments166 Cummings CenterBeverly, MA 01915 USAM-1406-E 03/05 RevE248098-001 Toll Free: 1-800-225-1480Tel:1-978-232-6000Dom. Fax:1-978-232-6015IntlFax:978-232-6031www.thermo.com/waterO 2005 Thermo Electron Corporation Registered Sample #1: 6.5 Sample #2: 6.6 Sample #3: 6.5 Is o 19001:2000 Sample#4: 6.6 Sample #5: 6.6 All rights reserved 4 of4 Mean: 6.56 Standard Deviation: 0.05 %CV: 0.83 Electrode Storage To ensure a quick response and free-flowing liquid junction, the sensing bulb and reference junction must notallowed to dry out. For short-term storage, soak electrode in pH Electrode Storage Solution. If Storage Solutionis not available, use about 200 mL of pH 7 buffer to which about 1 gm. KCl has been added, as a temporarysubstitute. For longer storage periods, the reference chamber should be filled and the filling hole securely covered. Coverthe sensing element and reference junction with its protective cap containing a few drops of storage solution.Before returning the electrode to use, prepare it as a new electrode. Equipment Setup Electrode Setup-ROSS° pH Electrode 1.Remove the protective shipping cap from sensing element and save for storage. 2. Clean any salt deposits from exterior by rinsing with deionized water.I. 3. Uncover filling hole add ROSS° filling solution. To maintain an adequate flow rate, the level of fillingsolution must cover the end of coil and be at least one inch above the sample level when immersed. Thefilling hole should be open whenever the electrode is in use. 4. Thoroughly wet the junction by pressing down on the electrode cap and allowing some of the ROSS°Internal Filling Solution to flow out of the electrode through the junction. Replenish lost filling solution. 5.Shake down the electrode to remove air bubbles. 6, Soak the electrode in pH electrode storage solution for one hour. Meter Setup-3 star benchtop For initial meter setup, follow the steps on the Reference Panel that is attached to the meter itself. The QuickStart Guide included with each meter also contains a layout of the meter keypad for reference. The words in allcapital letters such as POWER indicates a key on the meter, and words in quotations such as“Unit"indicatesinformation on the meter display. 1.Connect the electrode to the meter. 2. Connect the temperature probe to the meter. 3. Connect the stirrer to the meter. 4. Press the POWER key on the meter to turn the meter on. 5. Note that the arrow on the left of the screen indicates the active line. If not the top line is not active, pressthe LINE SELECTION key to change the selected line to the top line. Then press the UP or DOWNarrow keys to change the measurement mode of the top line to pH. .6Press the SETUP key to enter pH Setup. Press the LINE SELECTION key to select the middle line.Press the UP or DOWN arrow keys to select “rES” which is resolution. 7. Press the LINE SELECTION key to select the bottom line. Press the UP or DOWN arrow keys to select“0.1”for"rES”which is an abbreviation for resolution or number of significant digits. Press the LINESELECTION key to accept value. 8 Press the LINE SELECTION key to select the middle line, and press the UP or DOWN arrow key toselect“bUF” which is pH buffer. 9. Press the LINE SELECTION key to select the bottom line, and press the UP or DOWN arrow key toselect“USA”which is US/Orion°buffers. 10. Press the LINE SELECTION key to accept and select the pH Setup Menu line (Top Line). 11. Press the MEASURE key to return to the measurement mode. If all steps were followed correctly the meter display will show three digits in the top line and "pH"to the rightof the top line. The meter and electrode are now ready for calibration. Note: The Orion Benchtop Stirrer must be turned on in General Instrument Setupbefore, analysis, please see the Quickstart Guide for instructions. Calibration and Analysis 1. Allow all the standards and the samples to attain room temperature for precise measurements since themeasurement is temperature sensitive. 2. Calibrate the meter using the pH 7.00 buffer followed by the pH 4.01 buffer, stirring the standards at auniform rate. 3. Place electrode temperature probe, and stirrer into beaker with pH 7.00 buffer standard such that theelectrode tip is fully immersed in the solution. The stirrer should be positioned slightly below the tip of theelectrode. Press the STIRRER key on the meter to turn the stirrer on. Press the CALIBRATE key. 4. Wait for stable reading (1-2 minutes). Enter standard value of 7.00 using the UP and DOWN arrow keysand the DECIMAL /DIGIT key. 5. Press CALIBRATE key to accept 7.00 standard and press the STIRRER key to turn the stirrer off. 6. Rinse electrode, temperature probe, and stirrer thoroughly with deionized water. Gently remove excesssolution from the outer sleeve of the electrode by dabbing with a clean paper tissue. Do not wipe or rub thesensing element of the electrode. 7.Place the probes and stirrer into beaker with the pH 4.01 buffer standard such that the electrode tip is fullyimmersed in the solution. The stirrer should be positioned slightly below the tip of the electrode. Press theSTIRRER key on the meter to turn the stirrer on. 8 Wait for stable reading (1-2 minutes). Enter standard of 4.01 using the UP and DOWN arrow keys andthe DECIMAL /DIGIT key. 9. Press MEASURE key to accept 4.01standard and to move to the measure mode of the meter. Press theSTIRRER key to turn the stirrer off. 10. Rinse electrode temperature probe, and stirrer thoroughly with deionized water. Gently remove excessPlasolution from the outer sleeve of the electrode by dabbing with a clean paper tissue. Do not wipe or rub thesensing element. www.thermo.com of ofof
确定
还剩1页未读,是否继续阅读?

产品配置单


赛默飞中国实验室产品事业部为您提供《牛奶中ph检测方案 》,该方案主要用于液体乳中理化分析检测,参考标准--,《牛奶中ph检测方案 》用到的仪器有台式pH/ORP/ISE/溶解氧/电导率测量仪、Orion 4-Star系列台式(便携式)pH/离子浓度,pH/电导率,pH/溶解氧测量仪
相关方案
更多
该厂商其他方案
更多